For the ongoing project to make myself a custom mechanical keyboard, with an intention to get more familiar with embedded programming and soldering, I bought some blue pills (STM32F103C8T6 based microcontroller boards). At under €1.50 each these extremely popular microcontrollers seemed like a great enough deal to get 5 of them at once.
The intention is to eventually have a cheap Rust-based keyboard hardware-firmware combo for custom keyboard makers. Current status quo is Teensy, which will set you back for €13.5 plus shipping. For a less capable AVR board. Seems a shame to spend so much for what is technically less capable hardware. What Teensy has and the Blue Pill hasn’t, however, is the convenience and tools.
Most notably, a Blue Pill microcontroller doesn’t come ability to be programmed via USB by default. It is necessary to program these via a Serial or JTAG SWD interface instead. Doing either requires extra hardware. While some recent PC motherboards still include a serial port, laptops certainly won’t have one; so a USB to USART converter may be necessary.
JTAG SWD is a much more convenient interface compared to Serial – it has extra capabilities, such as being able to debug a controller as it is running. Alas, not unlike Serial, a “dongle” of sorts is necessary – for STM32 in particular the keyword is ST-LINK – and these go anywhere from €1.7 for Chinese-made dongles to €60 for a official ST-LINK with digital isolation.
Turns out it is possible to convert one of those Blue Pills into a ST-LINK too. Ideal option for me, as I happen to have multiple of these microcontrollers already. Except… to make a Blue Pill into a ST-LINK, it is necessary to flash it, which gets us back to square one…
For the technique described in the post, the necessary hardware is:
- At least two STM32F103C8T6-based Blue Pill microcontrollers;
- A USB-to-Serial converter;
- Four cables to connect the converter with a Blue Pill, and later the two Blue Pills;
- A USB cable for connecting the Probe to a computer.
Software
The software I used for the JTAG SWD debugger is called Black Magic Probe. Because of its simplicity I ended up choosing stm32loader to do the flashing over the UART interface. Finally, a toolchain (gcc, gdb1, …) for arm-none-eabi target is necessary. Install the compiler and clone the projects:
arm-none-eabi-gcc --version # should print something
git clone https://github.com/jsnyder/stm32loader.git
git clone https://github.com/blacksphere/blackmagic.git
The usual build of Black Magic Probe consists of two binaries, which I couldn’t easily program with stm32loader, so some extra preparation was necessary after the build:
cd blackmagic
make -j PROBE_HOST=stlink
cp src/blackmagic_dfu.bin ./
truncate --size=8192 blackmagic_dfu.bin
cat blackmagic_dfu.bin src/blackmagic.bin > blackmagic_full.bin
This results in a single binary firmware file blackmagic_full.bin which can then be easily
flashed into the Probe-to-be.
Flashing the Black Magic Probe
Now that the Black Magic Probe firmware is ready, it is time to connect to the Blue Pill and flash it! I’m using a CH340G-based USB-to-RS232 converter for my Serial communication needs. Making sure no components are connected to anything else, this is how I connected the converter to the Blue Pill.
| Dongle | Blue Pill |
|---|---|
| GND | G |
| 5V or 3V3 | 5V or 3.3 |
| TXD | A10 |
| RXD | A9 |
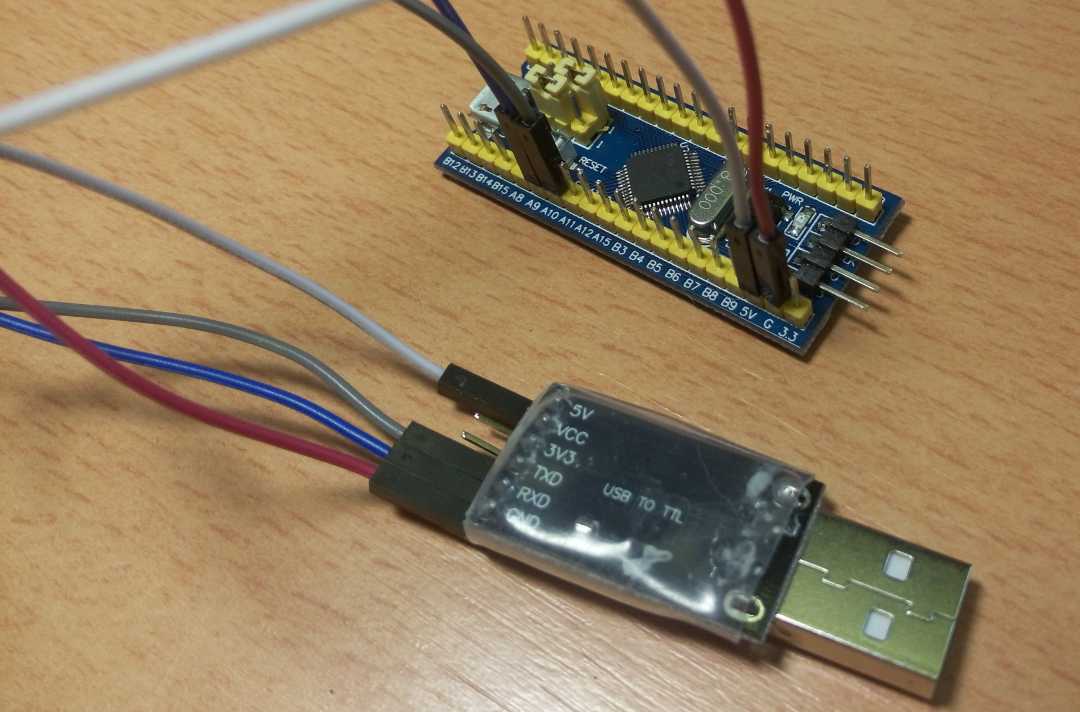
Then, replace the BOOT0 jumper so it is adjacent to the “1” marking (see the image above) and plug the converter into a computer. Verify that the OS can see the converter; Flash the firmware prepared in the previous section:
$ dmesg
[...] usb 3-1: new full-speed USB device number 4 using xhci_hcd
[...] usbcore: registered new interface driver usbserial
[...] usbcore: registered new interface driver usbserial_generic
[...] usbserial: USB Serial support registered for generic
[...] usbcore: registered new interface driver ch341
[...] usbserial: USB Serial support registered for ch341-uart
[...] ch341 3-1:1.0: ch341-uart converter detected
[...] usb 3-1: ch341-uart converter now attached to ttyUSB0
$ sudo python2 stm32loader.py -p /dev/ttyUSB0
Bootloader version 22
Chip id: 0x410 (STM32 Medium-density)
$ sudo python2 stm32loader.py -p /dev/ttyUSB0 -e -w -v blackmagic_full.bin
<snip>
Note that ttyUSB0 part of the command above might differ depending on your system. Once the last
command shows signs of success, the connected microcontroller is a full fledged Black Magic Probe.
Disconnect the newly minted Black Magic Probe from the converter and reset the BOOT0 jumper to its
original position (so it is adjacent to “0” marking). The converter won’t be necessary anymore,
unless you want to make another probe, or something goes wrong and you need to (re-)flash
your current one. Verify that the Black Magic Probe is working correctly by connecting it to the
computer via USB cable and checking the OS logs:
$ dmesg
[...] usb 3-1: new full-speed USB device number 5 using xhci_hcd
[...] cdc_acm 3-1:1.0: ttyACM0: USB ACM device
[...] cdc_acm 3-1:1.2: ttyACM1: USB ACM device
[...] usbcore: registered new interface driver cdc_acm
[...] cdc_acm: USB Abstract Control Model driver for USB modems and ISDN adaptersUsing the Black Magic
With a working Black Magic Probe in hand, we can now get involved in the actual development of firmware for Blue Pills. Connect the Probe with another Blue Pill microcontroller like so:
| Probe | Target |
|---|---|
| GND | GND |
| B14 | SWDIO |
| A5 | SWCLK |
| POWER | 3.3 |
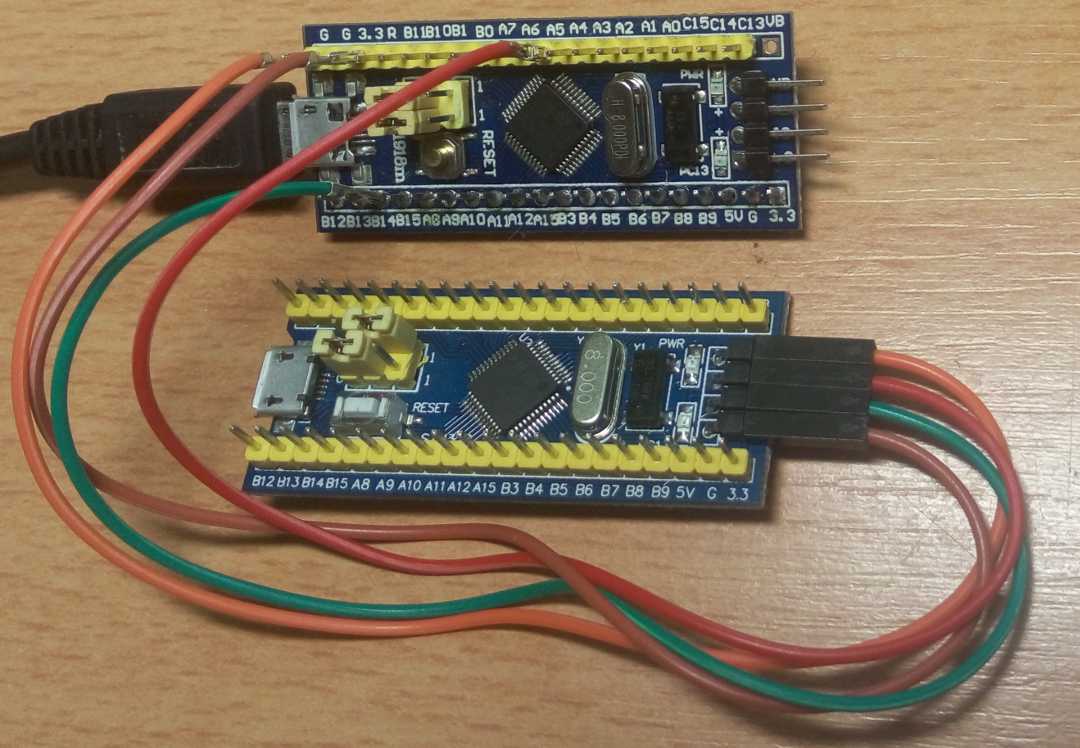
I recommend having BOOT0 set to “1” on the target for development purposes (as shown in the picture above). In case of bug in the target firmware, it makes returning to a working and responsive state as easy as clicking the RST button.
With everything connected together, use gdb to flash and run some firmware on the target:
arm-none-eabi-gdb -ex "target extended-remote /dev/ttyACM0" \
-ex "monitor swdp_scan" \
-ex "attach 1" \
-ex "load target/thumbv7m-none-eabi/release/firmware" \
-ex "file target/thumbv7m-none-eabi/release/firmware" \
-ex "compare-sections" \
-ex "c"Alternatively, you can maintain a .gdbinit script which would execute these commands during gdb
start-up. This being GDB the full power of the debugger is available. Breakpoints, disassembler,
stepping, data watchers and so on.
Having spent some time using these probes for development, I really appreciate being able to use full power of GDB to figure out problems in my code. At a low price of possibly the cheapest ARM microcontroller and 10 minutes needed to flash the probe, this makes embedded development very approachable.
clang and lldb could also be used, but using them is out of scope for this post.↩︎